


Specifications
Method One:
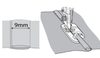
- Snap on the Flat-Felled Foot 9 mm Foot.
- Place the wrong sides of the fabrics together and overlap the raw edges by using the red markings on the foot as a guide. The lower fabric should follow the marking on the right side of the foot and the upper fabric should follow the red marking on the right front side. (This will result in a double row of stitching on the right side of the garment. If you want a single row of stithing on the garment, stitch right sides of the fabric together.)
- Stitch fabric together with a straight stitch
- Press the seam allowance to the left
- Use the guides on the front of the Flat-Felled Foot to fold the wider seam allowance around the narrower seam allowance. Stitch in place using a straight stitch.
Method Two:
If you have a seam allowance of 15 mm (5⁄8") included in your pattern, use the outer right markings on the Flat-Felled Foot as a guide for both layers. Cut off 6mm from the top seam allowance. Then continue with step 4.