Menu

Montavilla Sewing Centers

  • Classes
  • Events
  • Clubs
  • Calendar
  • Instructors
  • Products
  • Services
  • Locations
  • Blog
  • About Us
  • Contact Us
  • Privacy Policy
  • Login
  • Register

Trade-Ins Welcome

Contact us to get an estimate.

0% interest financing and layaway plans available. Contact us for more information.

Free private machine usage lessons with all machine purchases.

All machines come with a 1 year service warranty.

0% interest financing and layaway plans available.

Ask us about Montavilla Advantage Plus!

Husqvarna Viking Invisible Zipper Foot

By Husqvarna Viking

Contact us

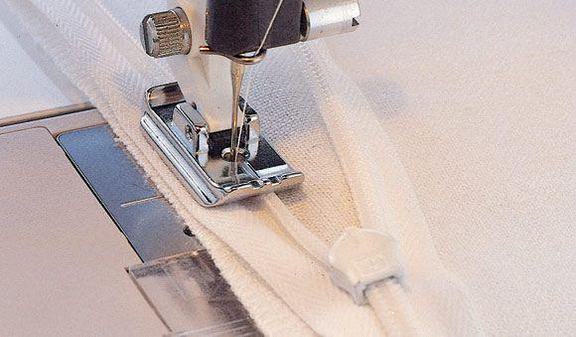
An invisible zipper is always inserted before stitching the garment seam.The Invisible Zipper Foot has two grooves underneath the foot to accommodate the zipper coils and hold them in place as you stitch. Buy a zipper that is at least 1 1⁄4" (3 cm) longer than the zipper opening.

  • Top Features
  • Specifications
  • What's Included
  • Documents
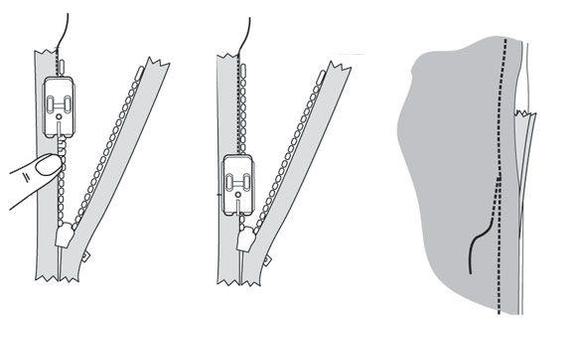
  1. Mark the length of the zipper opening on the seam allowance and on the zipper. The excess length should be at the bottom of the zipper. Snap on the Invisible Zipper Foot. Select center needle position straight stitch. Length 2.5–3.0.
  2. Unzip the zipper.
  3. Place the right part of the zipper on the fabric right sides together. The coil should be on the seam line and the top stop of the zipper 3⁄4" (2 cm) below the cut edge of the fabric.
  4. Finger press up the zipper coils and lower the presser foot with the zipper coils in the right opening under the foot. Adjust needle position to align the needle with the needle guide on the front of the foot. Backstitch and sew. Stop at the mark on the zipper and seam allowance and backstitch to tie off.
  5. Place the left part of the zipper right sides together with the left side of the garment. Lower the presser foot with the left opening over the zipper teeth. Make sure that the needle is perfectly aligned with the needle guide in front of the foot again. Sew in the same way as the first side.
  6. Pull up the zipper pull. Place the fabric with the zipper right sides together. Snap on the regular Zipper Foot E to the left of the needle. Adjust needle position to the right. Pin the rest of the fabric below the zipper right sides together. Sew the seam from the lower edge and up to the zipper overlapping the backstitched seam. If the zipper is too long, whipstitch across the zipper teeth 1 1⁄4" (3 cm) below the inserted zipper length. Cut away excess zipper below the whipstitching.
Specifications

  1. Mark the length of the zipper opening on the seam allowance and on the zipper. The excess length should be at the bottom of the zipper. Snap on the Invisible Zipper Foot. Select center needle position straight stitch. Length 2.5–3.0.
  2. Unzip the zipper.
  3. Place the right part of the zipper on the fabric right sides together. The coil should be on the seam line and the top stop of the zipper 3⁄4" (2 cm) below the cut edge of the fabric.
  4. Finger press up the zipper coils and lower the presser foot with the zipper coils in the right opening under the foot. Adjust needle position to align the needle with the needle guide on the front of the foot. Backstitch and sew. Stop at the mark on the zipper and seam allowance and backstitch to tie off.
  5. Place the left part of the zipper right sides together with the left side of the garment. Lower the presser foot with the left opening over the zipper teeth. Make sure that the needle is perfectly aligned with the needle guide in front of the foot again. Sew in the same way as the first side.
  6. Pull up the zipper pull. Place the fabric with the zipper right sides together. Snap on the regular Zipper Foot E to the left of the needle. Adjust needle position to the right. Pin the rest of the fabric below the zipper right sides together. Sew the seam from the lower edge and up to the zipper overlapping the backstitched seam. If the zipper is too long, whipstitch across the zipper teeth 1 1⁄4" (3 cm) below the inserted zipper length. Cut away excess zipper below the whipstitching.

Warranty

Brochures

Instruction Manuals

Related Products

  • Navigation
  • About Us
  • Services
  • Blog
  • Contact Us
  • Your Account
  • Privacy Policy
  • Locations
  • Portland
  • Beaverton
  • Lake Oswego
  • Gresham
  • Classes & More
  • Classes
  • Events
  • Clubs
  • Instructors
  • Calendars
  • Portland
  • Beaverton
  • Lake Oswego
  • Gresham
  • Products
  • Machines
  • Software
  • Furniture
  • Accessories
  • Contact
  • (503) 254-7317
  • (800) 854-1430
  • 8326 SE Stark St
    Portland, OR 97216
Copyright © Montavilla Sewing Centers 1949 ‐ 2021