Pfaff Free-Motion/Darning Foot

By Pfaff

Trade-Ins Welcome!

Call (971) 803-7665 or email us for a trade-in estimate.

Pre-Owned Machines Available!

Click Here to view our current selection!

Pfaff Free-Motion/Darning Foot

By Pfaff

SKU#: 413039601

This product is not available for purchase online. Please Contact Us for pricing & purchase options.

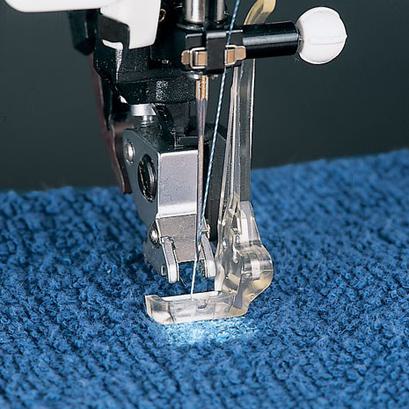
The Free-motion/Darning Foot is perfect for sewing free-motion embroidery or darning.

Trade-Ins Welcome!

Call (971) 803-7665 or email us for a trade-in estimate.

Pre-Owned Machines Available!

Click Here to view our current selection!

Not compatible with Pfaff hobby™ 301, 303.

  1. Make sure the needle is at its highest position.
  2. Attach the Darning Foot: with your thumb and finger, squeezing the front and back of the foot together. Insert the pin of the Darning Foot as far as it will go into the hole at the back of the presser foot holder.
  3. The “C-shaped” Guide should be positioned around the presser bar. The long arm must be behind the needle clamp. Tighten the screw.
  4. Lower the feed dogs.
  5. If you like, you can hoop the project in a round embroidery hoop for more stability.
  6. Select a straight stitch and activate the free-motion function, or put the presser foot in the darning/free-motion position.
  7. Pull up the bobbin thread and sew a few stitches to secure. Clip the thread ends close to the project and continue sewing.

TIP: Remember, when sewing with the feed dogs lowered, the stitch length is determined by you. An even, medium-to-fast sewing speed will allow you to sew a more consistent length of straight stitch. Sewing too slowly may cause small knots to appear on the reverse side of your work.
Specifications

Not compatible with Pfaff hobby™ 301, 303.

  1. Make sure the needle is at its highest position.
  2. Attach the Darning Foot: with your thumb and finger, squeezing the front and back of the foot together. Insert the pin of the Darning Foot as far as it will go into the hole at the back of the presser foot holder.
  3. The “C-shaped” Guide should be positioned around the presser bar. The long arm must be behind the needle clamp. Tighten the screw.
  4. Lower the feed dogs.
  5. If you like, you can hoop the project in a round embroidery hoop for more stability.
  6. Select a straight stitch and activate the free-motion function, or put the presser foot in the darning/free-motion position.
  7. Pull up the bobbin thread and sew a few stitches to secure. Clip the thread ends close to the project and continue sewing.

TIP: Remember, when sewing with the feed dogs lowered, the stitch length is determined by you. An even, medium-to-fast sewing speed will allow you to sew a more consistent length of straight stitch. Sewing too slowly may cause small knots to appear on the reverse side of your work.

Warranty

Subtotal: $0.00 View Cart